Tuesday, March 31, 2009

Finale

So...its all done. Mucho thanks to my dad for all his help. I have about 70 hours into it and I'm sure he's got somewhere between 12-16 hours into it as well. Thanks to Danny Bally for giving me proper warnings before I began and thanks to Jon for helping vectorize the skull sketches.

The whole process was awesome. I would totally do this all over again. In fact, I have a TON of ideas for other bikes. I'm really happy with how it turned out. For my first effort I think it came out pretty well. It looks kick ass from about 10 feet away. The finish could be smoother, some of the graphic edges could be smoother as well but you have to be right up on it to see that. And I'm pretty darn picky about every little detail. I learned so much in the last few weeks about the bike, about painting, about the electrical system. It has just been an awesome project. I think the coolest father/son project I've ever done. Sure beats building bird houses for shop class in grade school.

I still may take it apart next winter and wet sand down the clear and add a few more coats to it, but for now, I'm just gonna enjoy riding it again and showing it off at bike night.

in a few days I'm going to take a few really nice shots of it outside with a nice backdrop. I just gotta give this crazy weather a day or two to calm down.


Sunday, March 29, 2009

Steps - 19, 20, 21 & 22

I'm gonna jam a few steps into on because they are quick. So step 19 was getting the paint in and fixing the black on the two pieces. That turned out to be really easy, two coats over that and it was done.

20 white stripes on tank - that was pretty quick and easy, actually.

21 clear - For this stage I decided that the make shift paint booth in the garage was not gonna be sufficient or safe. Clear coat is really, really, really nasty shit. I even spent another $200 on a full face gas mask so that no vapor could get to my face, or eyes in any way. And I'm glad I did. Fortunately, on the air force base is a full blown filtered professional paint booth that I could rent through my Dad. Nice benefit to having a retired Colonel as a Dad. So we went down there Saturday morning and set up. We got all the pieces set up and ready. Then we popped open then clear coat and it had settled...REALLY settled. There was this hockey puck of opaque stuff in the bottom that can of paint and when we started stirring it was obvious that was gonna take a while. So we chunked it up as much as we could and then started shaking vigorously for about 5 minutes and sure enough that mixed it right up.


The clear went on different than the paint. I was very light with it and I actually shoulda been a little heavier handed with it. I was worried about loading it up too much but its pretty sticky stuff. After the first coat I was a lot more direct with the spray. I actually could have put on another whole can of clear and I think I might actually go back and do more later on. In a few months or something, I was just too anxious to get it together and riding again right now.

22 assembly - So putting it back together took about 4 hours of work. And an hour of that alone was just the front fairing with the headlights. Getting that all back in and working was a bitch and totally a two person job. In fact another pair of hands might have been handy actually. So my dad and I worked from about 8 to midnight and got the tank, front and sides back on, and the front lights working.

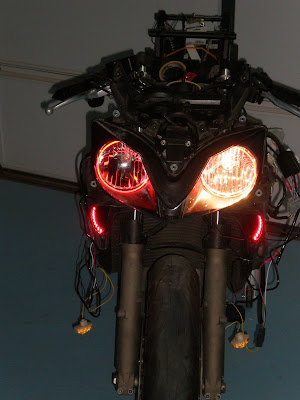
In this shot you can see the intake LED's as running lights. they look really cool and they also work as turn signals in conjunction with the amber (legally required0 side turn signals. i really wish I didn't need the sides to be amber.

This shot is of the tiny little toggle swtich for the halo's. It's sahped like a skull and lights up when ON.

Then he went in and I was too excited to stop so I worked for a few more hours, until about 2:30am on the tail, undertail and seats... enough to get it so that I could see what it looked like when it was "done". And boy did that feel good. Seeing it done is just awesome after all this work.

Then on Monday, Dad and I kicked into the last bits at about 4pm. We just needed to rig the trunk key latch and connect the wiring tucked inside the tail nice and neat. I've got a great set of pictured instructions that I'll be posting to the forums for the undertail since those instructions are ridiculously useless. So we wrapped it up and poured in a few gallons of gas and she started right up. I took it for a quick spin around the block to make sure it stayed together. and even though it was like 40 degrees and windy I could have driven it all night long.

Monday, March 9, 2009

Step 18- Progress

Well, today the paint didn't come in, I found out that they had accidentally ordered the wrong color and that's why it was coming all the way from CT and thus still hadn't arrived. they had reordered the correct color from Denver and it should be here by tomorrow morning. It should arrive at or before 11am. Which is the last possible minute that it can arrive that I can still get to the paint booth in time to finish the black, get the white on the tank and then clear coat it all. Then I'll be home with it a few hours later and basically just have to put it back together.

Last night, I was researching the electrical shit on the turn signals and found out that HONDA's typically have running lights on the front turn signals anyway, and that was why my set up wasn't working. The magic blinkers are designed to reverse the action of normal non running light turn signals. (to go from normal off to blinking ON at turn to normal ON and blinking OFF at turn) well if they are already running lights then you can't reverse that. So the trick was to route a power supply from another "hot when keyed on" source, like a headlight or something.

that proved to do the trick perfectly. So I got all the lights hooked up and working properly. The halo's work, the two sets of turn signals/running lights work up front, and the LED's in back work as well.

Now, I just have to finish painting, put it together, get some gas in it, take it for a quick test drive, and then hook up the power commander and get the right map installed and it should be good to go. oh wait, I forgot, I still need to rig the tail section with the lock, that's gonna take a bit to get set right but, like I said a few posts back, I got the easy fix figured out already.

Here's a preview of the lights...with no body, of course. And now that I see them on like this I really want to look into if its legal to have no actual white headlight on at all times and be able to switch on and off the low beams so I can drive around with only the halo's on and only switch on the beams when I need to see where I'm going.

Here is the shot with the lights all working with the key on and the Halo's switched on. You can see the halo's the one headlight and the intake lights (curved red LED's) the amber side signals are hanging down almost on the floor. (I really wish I didn't need to legally have the side signals be amber, I'd like to go red on all the lights.)


And here is what it will look like parked with the ignition off and the Halo's switched on.


It's kinda hard to see in here actually because the way the light reflects so much you don't really get near as good of an impression as you do in person.

keeping fingers crossed for tomorrow.

Saturday, March 7, 2009

Step 17 - Electrical

Today was a roller coaster. I realized that in order to paint the clear coat I need significantly more protection than what I had. That clear coat is really nasty stuff. So I had to run over to the supply shop and get a full face mask with glass face shield and heavy duty filters. Two hundred and two dollars later, I was on my way back home. The wind was terrible today so there was no way I was gonna get any painting done and it became more evident to me that I really could not paint the clear in a garage anyway. It is extremely unsafe and it's very bad on the surface to have that much dust flying around. I really need a clean room with filtration and adequate lighting.

I called around and found a place that rents a booth for $45 which was great, except they didnt have a slot open until wed or thurs.

Then we found one on base. What a wonderful benefit of having a a retired colonel as a Dad. Full military perks. they've got a booth on base and it rents ridiculously cheap. and it was wide open. So we rushed home to pack shit up and head over.

Half way through packing up I remembered that I couldn't clear coat the tank and tail yet, because I still had to redo the black base coat. So we decided it was best to just wait until Tuesday in order to do it all in one shot. So we unloaded the truck and decided to check on the electrical system with the new LED turn signals.

That turned out to be a very frustrating experience. there was just no way that we could figure out, either by following the directions or coming up with our own ideas that we could get the lights to both blink when it was time to blink and stay on as running lights the rest of the time.
I might have some defective parts but I have no idea so now I get to wait until Monday so I can call support over at the place I got the lights from and ask if I'm doing something stupid or if something is messed up.

I did, however, get the replacement bulb for the Angel Eye light and finished that install and those look kick ass. I was going to do a custom wiring job on that too so that they were on all the time and then when I hit my high beams, then both the headlines would come on. The idea being that normally, I could drive around with just the angel eyes on and not have that one constantly ON headlight messing up the light. I'm not even sure if that's legal yet. And given the horrible electric day I had today I might not mess with it that much.

ok I'm exhausted after being up until 330a this morning. its time to veg for a bit.

Step 16 - The white coat

There's actually some pics left from the last round, but I was too tired to upload them. this is how the Angel Eyes go into the headlight housing. We actually modified the instructions and drilled 2 little holes as you can see in the next two shots to help hold the unit in place. Works really well actually.


This is what the housing looks like all pulled apart. Waiting on the replacement bulb to get here today so I can wrap this up. According to UPS it is on its way over right now. I'm hoping there aren't many Saturday deliveries so it gets here fast.


So, last night was probably the most exciting night of painting yet. That's because the actual graphics show up in this step. It also was the longest step. I started masking at around 4:30pm. Stopped for about 10 minutes to throw some food down (no, I didn't chew, they were noodles, they are already soft..shut up, I know what you are thinking) Then continued to mask until around 9pm.

The next few shots show what it looks like all masked off.


Then the painting starts. I was anxious to get the white paint going. I couldn't wait to see the white on the black. So I start painting and Dad chases me around to each piece with the blow dryer drying them off as I'm going. That's the beauty of Auto Air Colors paint. It dries really fast. It also helps with the dust since it dries so fast there isn't a lot of dust that can settle on it. We did still have a dust issue though and had to deal with shit on the surface a lot. It's just impossible to get a dust free environment unless you actually create a sealed spray room. So I have resolved to a less than perfect finish on the surface. It's not bad, but it's not perfect.

The clear coat is really what I'm worried about. I should be doing that right now but I can't because the wind is horrible out side and I can't really seal myself up in the garage even because the clear coat is extremely toxic. And they recommend using a fully enclosed air fed mask to avoid it touching skin, eyes or accidentally inhaled. It's pretty scary stuff. Even the really nice carbon filters we have now aren't really enough to protect you according to the instructions.


As it started going on, the white, I mean, I realized that it was going to take a LOT of coats. After about 10 coats it was still very gray and just approaching silver. You can see in the pics that it looks very silver. The Pearl aspect of the paint reflects so it adds to that with the black showing through.


After about, oh I'd say approximately 30-40 light coats, I realized that it wasn't getting any WHITER. Maybe I should have played some country music, that might have helped. =) So I put on about 5-8 more coats after that and called it quits. I resolved to accept the silvery color although it had gotten whiter than before when it was really silver. I also figured that it would look a lot more white when it was contrast on the black anyway and that it was hard to see that after so many coats and all the surrounding area the same color.

I cleaned up all the paint shit to give it some dry time and then blow dried it a little more and started pealing the tape off... around 2:00am. That was a long night of hammering away at it. And I loved every second of it. Would have been nice to not have to put so many white coats on though, had I known how transparent it was, I would have gotten another primer type paint from AutoAirColors so that I could cover the black faster and work on top of a neutral.

Anyway, peeling off the tape was awesome. its great to see that contrast. I actually had to take the Exacto knife and retrace all of the mask lines because the amount of paint was sealing the mask tape and it started to pull it off the black when I removed the tape. So that took a little longer as well. Just one more thing to slow me down from seeing the finished graphics.

But it looks really nice when I did get it off. and it did look whiter than I thought it was going to after seeing the silver. It's not as white as I expected it to be prior to starting, but it is really nice and I do like the way it came out.

Here's the front fender and the top front fairing:


The Tail...


And the best part... the windshield with the skull. (it looks really cool when its inserted into the top fairing but I can't hold it and shoot it at the same time, so y'all are just gonna have to wait a bit longer for that)

Thursday, March 5, 2009

Step 15 - Another Set Back

I went to the paint shop this morning with two of the pieces in hand to show them what was happening on the undertail. It looks like fish eyes, as if you are painting with oil based paints. Except I'm using water based paints. So it kinda looks like water spots, but that wouldn't happen with water based paints either.

Well the guys in the shop don't know a whole lot about the water based paints yet since they are so new. But we came to the conclusion that the surface was probably contaminated some how and that's why the spots were showing up so badly. I'm not totally convinced that's what it was. I think it was more likely the way the paint shot out of the gun. I'm going to switch to the other smaller air gun and see if that makes any difference. I resanded down the undertail and the gas tank to resurface it a little anyway just in case they were right.

Bad news is that they black paint has to be custom ordered and I ran out of what I had, so I have to wait 3 days for it to come in, so that will be like Monday at the earliest. Then I can repaint the black coat on those two pieces.

Meanwhile the other pieces look fine so I can move on to the white graphics and the clear coat on them....weather permitting. That's the other set back. there are dust storms going on here like Afghanistan and there is just no way in hell I can do the clear coat with this kind of dust kicking around. The black and white are one thing, they dry instantly, but the clear, that's gonna take a while to dry. So any dust in the air will stick to the clear and look like ass.

So I decided to mess with the skull stencil tonight, which actually went pretty well considering how the rest of the night was. I'm not sure the contact paper I have is strong enough to stick while painting over it but we'll find out. At least I'll have extra black in case I fuck it up this time.

Then I decided to try to get the angel eyes installed. so we put the headlight assembly in the over for 12 minutes and took out our nice little headlight loaf and managed to pull it apart. Then we kicked into getting the angel eyes in place. We decided that we needed to change the directions, of course, since we had a better idea. I thought it might be better to drill 2 little holes for the ends of the lights to stick thru. Which actually works better than the instructions tell you to do. however, as I was putting the right side in place I accidentally pressed too hard and snapped the damn light. which of course is one of the most expensive pieces on the bike. So now its all taken apart and I have one headlight done and the other is busted. great. now I can call them back and beg them to overnight only one replacement to me.

I installed the cool LED's in the front intakes tonight though and the glue on them is surprisingly strong. They are staying right where they were put, along a curve.

So anyway, tomorrow, back on the white graphics and we'll see how that goes.

Wednesday, March 4, 2009

Step 14 - Base Coat

Tonight was time to do the base coat. And the only time that had a time sensitive deadline. I had to get the base coat on, at least one full layer within 24 hours of the primer. So I had to start with sanding down the primer with 220 Grit wet and then 600 grit wet. There was a lot of dust and fuzz in the primer. That's causing some concern for the rest of the painting, particularly the clear coat. I'm going to have to rig up the garage differently and make it more air tight yet nicely ventilated because the clear coat is really nasty shit.

This paint is water based and only takes a 9:1 ratio of paint to reducer. I was warned about the spray going on sorta weird, like it was dry so I tried to keep my coats as thin as possible.


It wasn't easy at first to keep it thin because it was really hard to tell where the base coat was covering the primer. After the first full coat I sorta got the hang of that.

Then I had to fix the front fender. Right about the time I got to the 6th piece I noticed the gun spraying really weird, like in clumps. I messed with the gun settings but couldn't figure it out. After a few minutes I realized that the air compressor hadn't kicked on yet and it should have been. so the compressor wasn't actually on and I was depleting the tank of all the air so the pressure was dropping bad and making for a really shitty spray. Once I figured that out it was a lot better but in the process, I sprayed on a really thick section of the front fender and it was starting to buckle and crack. So I dried it and then sanded that part down again and smoothed it out with the rag and then repainted that fender again and fixed it. You can't even tell now, but it really pissed me off at the time.


All in all the base coat went on smooth. It dries really fast, within minutes of spraying it and you can dry it faster with a hair drier as well. the only thing I don't know about is how these spots are appearing on a few of the pieces. So it looks like I'm going to have to order some more black and wait a few days to get it in and do another coat. That really sucks because i'll totally miss the track day.

Im anxious to get the white started but I need to work out the black first. So the color looks great, everything is great except for those weird spots.

Step 13 - Primer

This is going to be a fast post because its actually for last night. I was just too tired last night to post. So last night was the primer coat. Cleaned the surfaces down, alcohol pad prepped them and then started spraying. My Dad and I had two guns hooked up and it turned out that only one gun was working right which was my gun so I did most of it. then I did the whole second coat because his gun was just acting really strange. We eventually found out it was the new water filter thing he had gotten that didn't let the right amount of air thru. The primer coats went on pretty smooth. I think I sprayed it on too thick though, because I had a pretty good orange peel texture going. It also dried a lot more glossy looking than I had expected for primer. I always thought primer was really flat but I guess that's not how this stuff works.

So we got the primer all done and let that dry for the night. I could see that dust and random fuzz was goign to be an issue. also the fact that we are in the middle of the desert and I have no ability to build a TRUE clean room, I have to deal with soem issues with dust. But at this stage its not a big deal because I can sand down the primer before I put a base coat on it.

Here's what it looked liked after the primer:


It's a lot shinier than expected, right? I know, weird.

Monday, March 2, 2009

Step 12 - the spray booth

aka the garage.

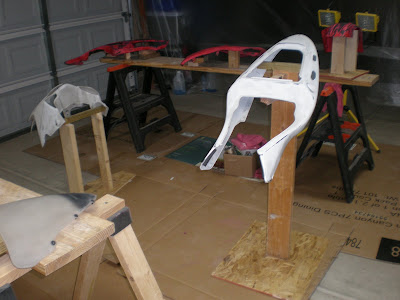
Tonight I set up the paint booth with my dad in his garage. we had a roll of painting plastic mask that was 9 feet wide by something like 400 feet long.

We sectioned off a bunch of the garage and then brought the pieces in to see how we needed to mount them. The we built a few racks for them and made sure they were easy to paint.

Last, I went over each one with a scotchpad and a bottle of SimpleGreen and cleaned every surface.